Last Updated on November 8, 2022 by ellen
Check out this Rainbow Felt Wreath DIY. Learn how to make a wreath with felt strips with this simple tutorial the kids can help with.
Posts may be sponsored. This post contains affiliate links, which means I will make a commission at no extra cost to you should you click through and make a purchase. As an Amazon Associate I earn from qualifying purchases.
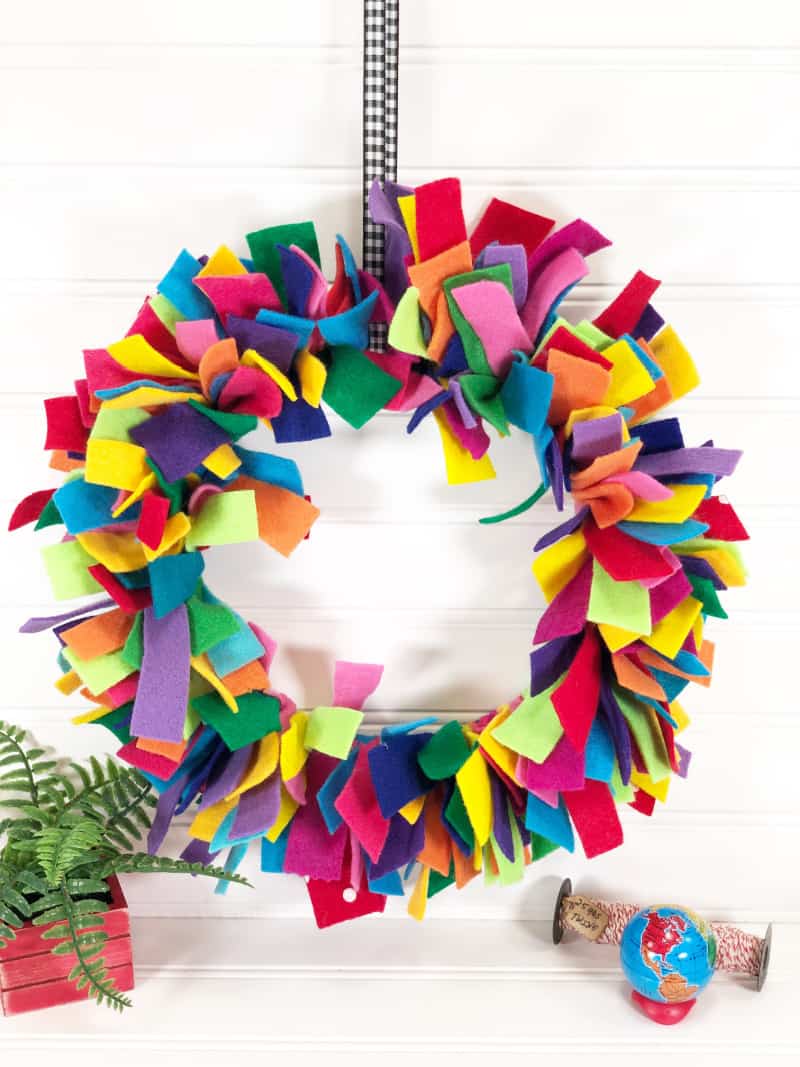
Table of Contents
Felt Wreath DIY
Wreaths are an easy way to dress up your front door and welcome friends and family. And, this easy felt wreath DIY is so simple that the kids can help you.
Quick and easy to create with just four supplies, this Rainbow Felt Wreath is a perfect craft to make on a budget. Check out Craftsy’s Free Classes for more fun craft ideas.
Mini embroidery hoops tied with scraps of felt would make perfect napkin rings or even ornaments if you’d like to find a few more ideas.
To attach this wreath to your front door, get one of these wreath hangers.
Don’t throw away your felt scraps!
You can use them to make this pretty wreath. If you don’t have felt scraps, you can always purchase felt craft cut sheets instead.

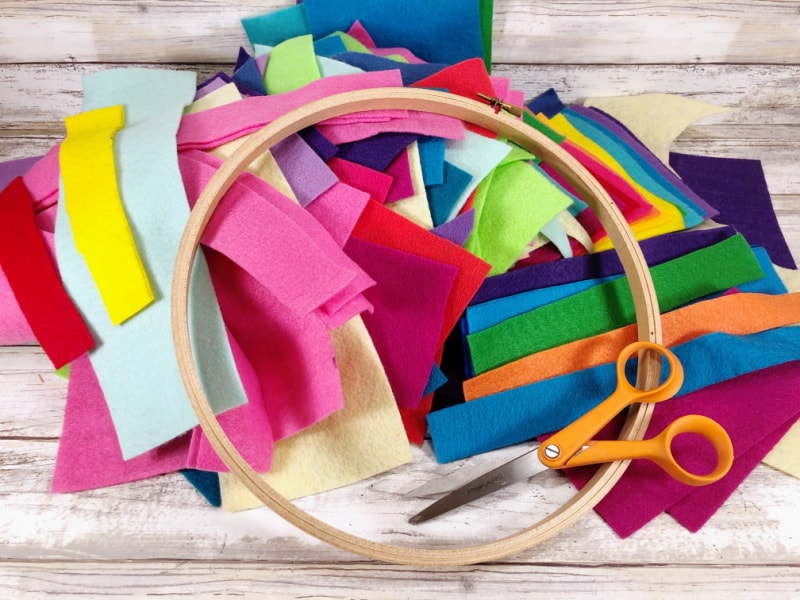
Supplies
- Classic Felt Craft Cuts Sheets 9” by 12” – Red, Yellow, Orange, Neon Green, Apple Green, Lagoon, Cadet Blue, Fuchsia, Candy Pink, Bright Lilac, Orchid, Purple, Cadet Blue, Peacock Blue, Brilliant Blue, Shocking Pink, or any colors you have on hand!
- Wooden Embroidery Hoop – 10″
- Scissors
- Ribbon or Twine
How do you make a wreath with felt strips?
Check out the easy steps for this felt wreath DIY:
Step 1 –
To begin the Rainbow Felt Wreath, gather all supplies. Remove the label from the embroidery hoop.
Loosen the screw on the embroidery hoop and separate the rings to create two wreaths. Organize all the colors of the felt scraps.
Use ALL the colors that you have on hand or purchase one sheet of 10-12 different rainbow colors. These felt craft sheets are under fifty cents each at the big box craft stores.
Step 2 –
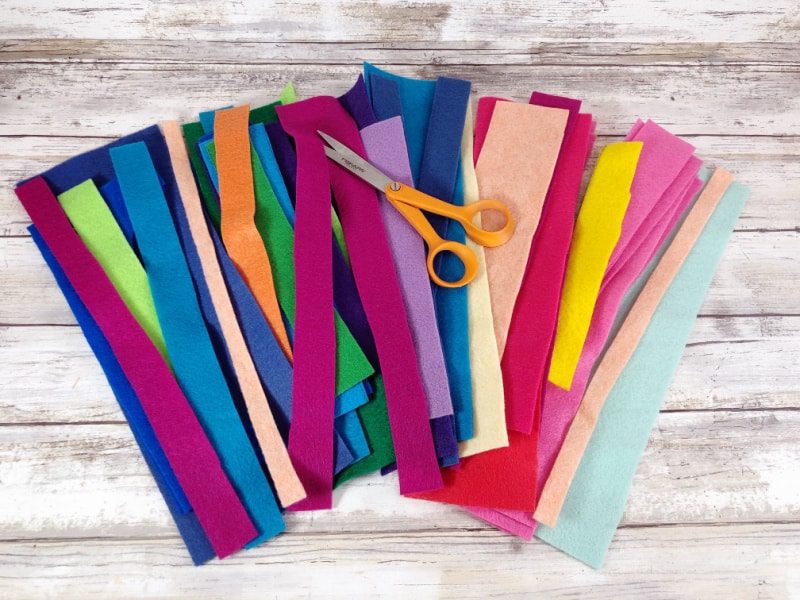
For this fall wreath DIY, use the 9″ width of the felt craft sheets, and make a stack of bits and pieces that are long enough. Randomly cut the scraps and/or the felt sheets into strips, some skinny and some fat, with scissors.
For this 10″ hoop cut approximately 100 strips. This is a great task to complete while watching television.
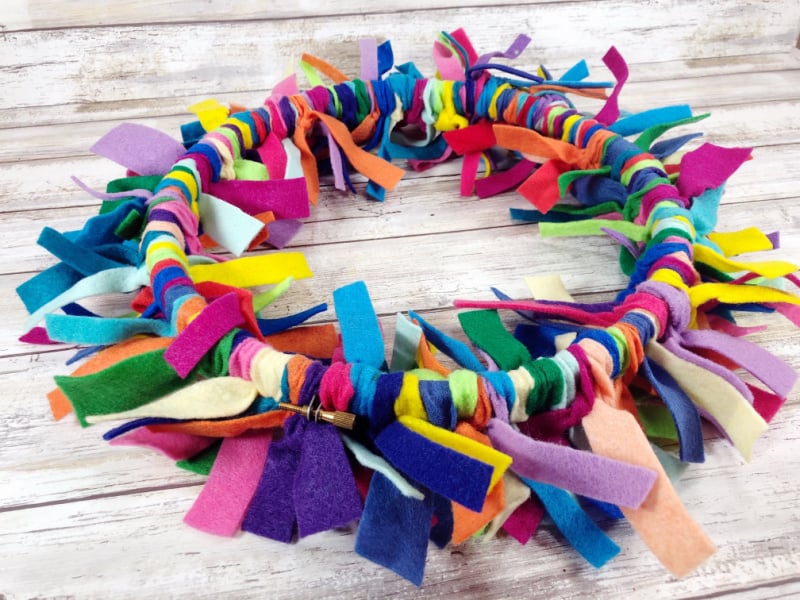
Step 3 –
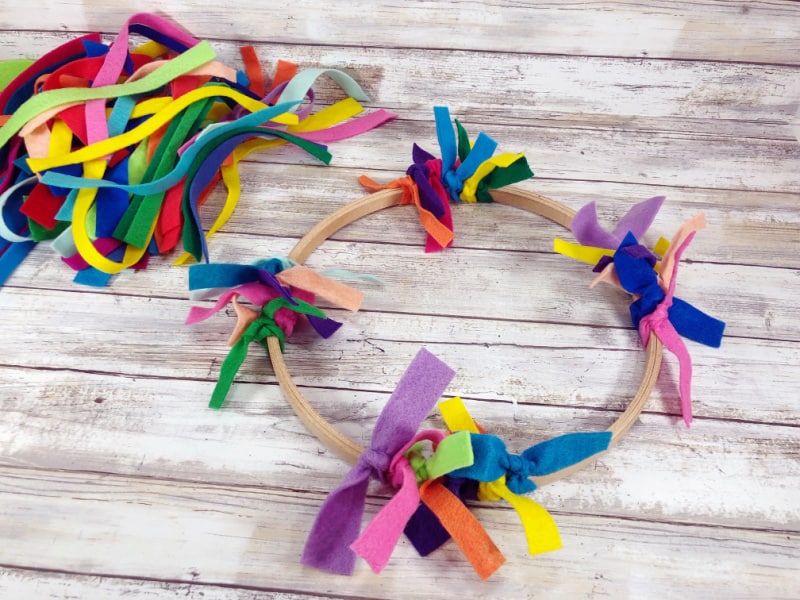
Start tying the strips felt around the embroidery hoop in double knots. Use the 12, 3, 6, and 9 o’clock marks as a starting point. This is a great activity for the kids to help with.

Step 4 –
Continue working around the entire hoop, pushing the strips together to get as many on as possible. The more felt strips tied onto the hoop the fluffier the wreath will be.
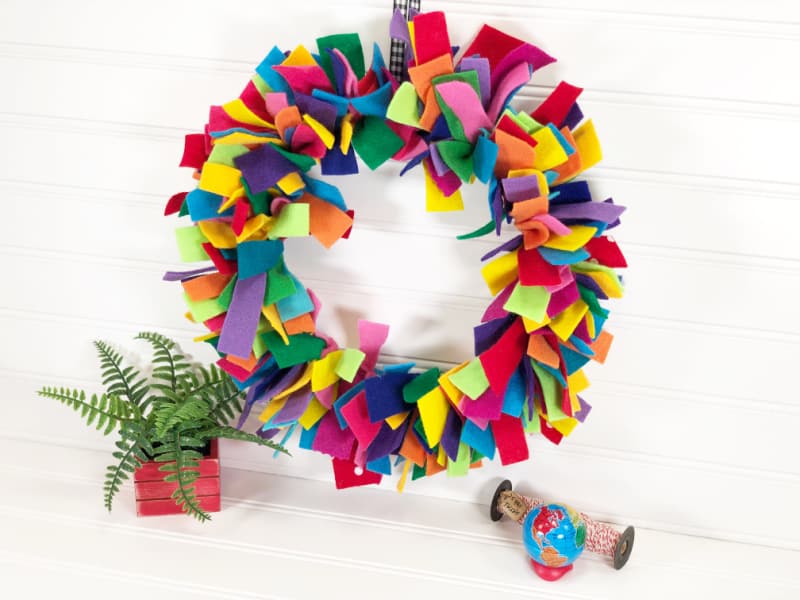
Step 5 –
To finish the Rainbow Felt Wreath, trim any long ends with scissors. Tie a ribbon or twine hanger at the top of the embroidery hoop.
How do you make a mini felt wreath?
Buy smaller embroidery hoops and cut smaller strips of felt. The process is the same no matter what size wreath you want to make.
More felt wreath ideas
This felt wreath DIY uses rainbow colors. It’s a gorgeous accent for spring or summer. But, you can consider these colors as well.
- Felt Christmas Wreath DIY – red and green
- Fall felt wreath DIY – orange, brown, gold, and red
- St. Patrick’s Day wreath – green and gold
- Easter felt wreath – pink, mint green, and lavender
You may also want to make this DIY soap for kids.

Felt Wreath DIY

Check out this Rainbow Felt Wreath DIY. Learn how to make a wreath with felt strips with this simple tutorial the kids can help with.
Materials
- Classic Felt Craft Cuts Sheets 9” by 12” – Red, Yellow, Orange, Neon Green, Apple Green, Lagoon, Cadet Blue, Fuchsia, Candy Pink, Bright Lilac, Orchid, Purple, Cadet Blue, Peacock Blue, Brilliant Blue, Shocking Pink, or any colors you have on hand!
- Wooden Embroidery Hoop – 10″
- Ribbon or Twine
Tools
- scissors
Instructions
- To begin the Rainbow Felt Wreath, gather all supplies. Remove the label from the embroidery hoop. Loosen the screw on the embroidery hoop and separate the rings to create two wreaths. Organize all the colors of the felt scraps. Use ALL the colors that you have on hand or purchase one sheet of 10-12 different rainbow colors.
- For this fall wreath DIY, use the 9″ width of the felt craft sheets, and make a stack of bits and pieces that are long enough. Randomly cut the scraps and/or the felt sheets into strips, some skinny and some fat, with scissors. For this 10″ hoop cut approximately 100 strips. This is a great task to complete while watching television.
- Start tying the strips felt around the embroidery hoop in double knots. Use the 12, 3, 6, and 9 o’clock marks as a starting point.
- Continue working around the entire hoop, pushing the strips together to get as many on as possible. The more felt strips tied onto the hoop the fluffier the wreath will be.
- To finish the Rainbow Felt Wreath, trim any long ends with scissors. Tie a ribbon or twine hanger at the top of the embroidery hoop.

Welcome to In Our Spare Time, your go-to source for family-friendly fun. Discover honest reviews, entertaining articles, and fresh ideas for making the most of your free time with younger kids. From games, movies, and books to family activities and seasonal adventures, we help parents find simple ways to create memorable moments together.